![]()

Real-time Volumetric Beverage Rendering for WebGL
There’s a brewery local to me with a great brand and some quality products, I watched them build their first brewery building from my office while I made front ends for ticket systems and flash banners for rail companies. I later found their beer while living in NL making marketing apps and installations for some big-brand beverage companies. Having returned to the UK and given that I do my grocery shopping near them too… It hit me while riding home that I should probably pitch something.
Whatever it would be, it would need to render interactive beer, ale, stout or wine in all its forms, do it well, and do it reeally quickly.
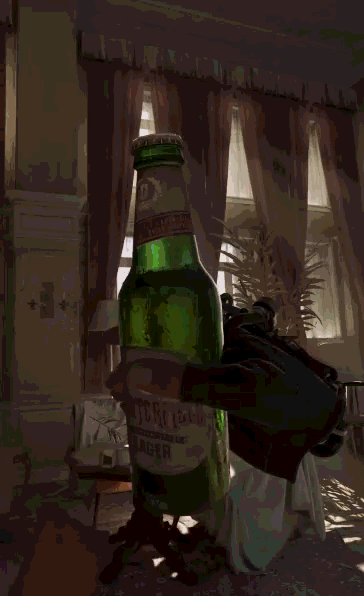
Behold! My real-time, interactive, ray traced, volumetric beverage renderer.
You can try it out here: https://pixelfat.com/files/folio/beverage_renderer
However, it’s best experienced on mobile which is what it’s designed and optimized for. So, if you’re on desktop right now just point your phone camera at this handy-dandy state of the art (in the 90’s) QR code and hit the link.

Potential Applications
I’ve made tons of marketing games and apps. So I hope to use this for something great, something entertaining and on-brand.
- Interactive product pages
- AR beer info-graphics
- Brewery taproom installations
- Trade-show displays
- Social media campaigns
- Product configurators
- Mobile-first promotional experiences
Limitations of the common approach
In recent years there have been some pretty cool solutions in games whereby a shader and a ‘slosh’ driver allows the developer to make a volume look as though it’s filled with fluid and have the surface react to movement. The most notable being Half-life Alyx.
The Booze Shader
Video credit – 2kliksphilip
After a bit of research into other folks attempts at this, I realized this is only good for a specific set of circumstances that I would have to work around:
- It is contained completely within a solid, mesh container.
- The bubbles are sparse and fleeting.
- The liquid is clear, It does not handle any kind of absorption, it’s purely refractive.
- There’s no states.
- There’s no foam head.
- It has an entire PC to run on.
- It runs natively, it’s not running in a browser, on a potato hand me down phone.
Adapting and Improving for Mobile and Web AR.
So, as most creative devs do.. I got a bee stuck in my head, constantly buzzing about shouting things like ‘Imagine this in AR!’ and ‘You know this is going to have to run on a website, right?’. Well, I thought.. it’s a pretty simple closed system. Ray in, ray out, refract, maybe color it a bit, clip the top and modulate the angle using some pendulum system. Hey presto! Got me a beer.
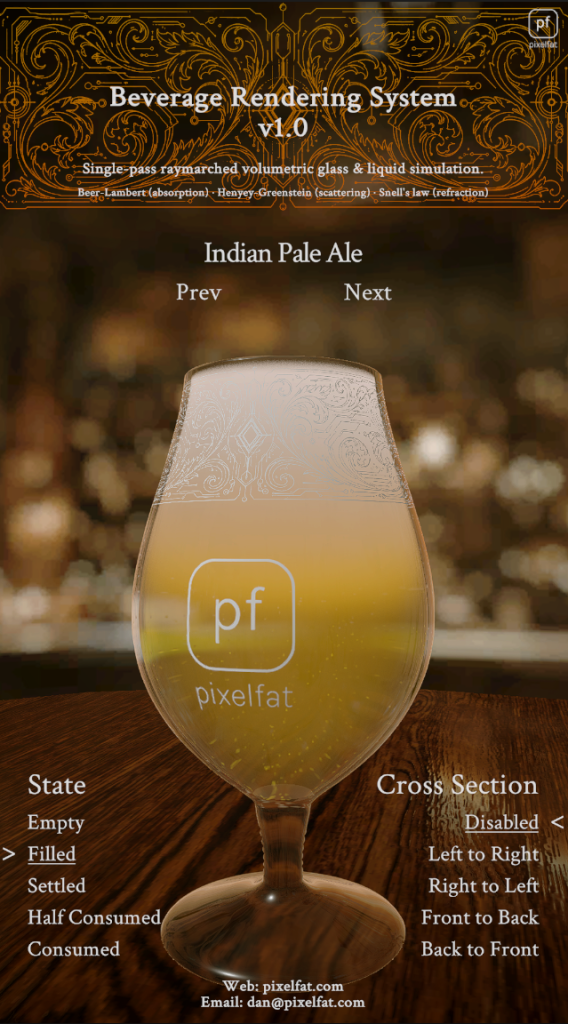
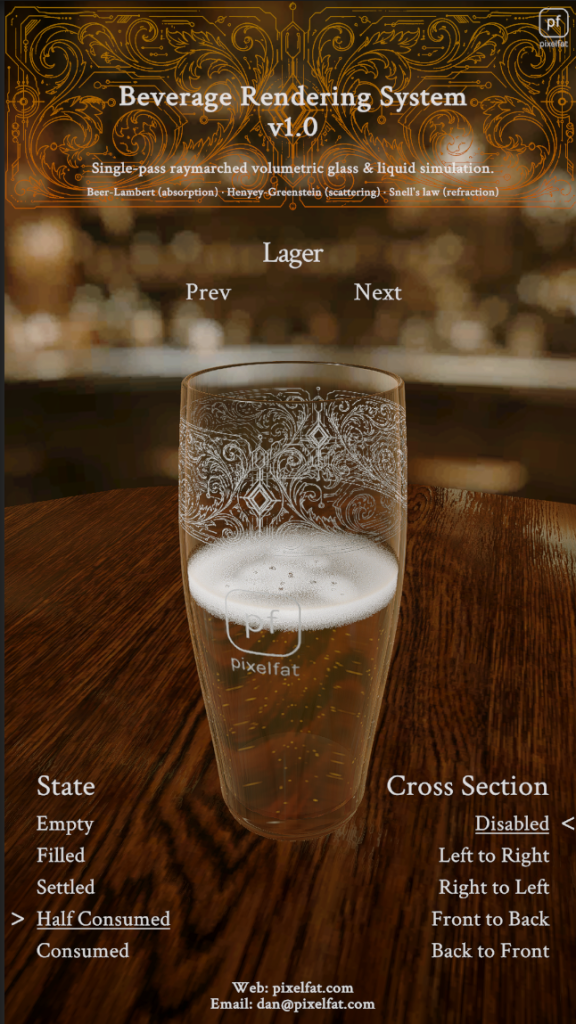
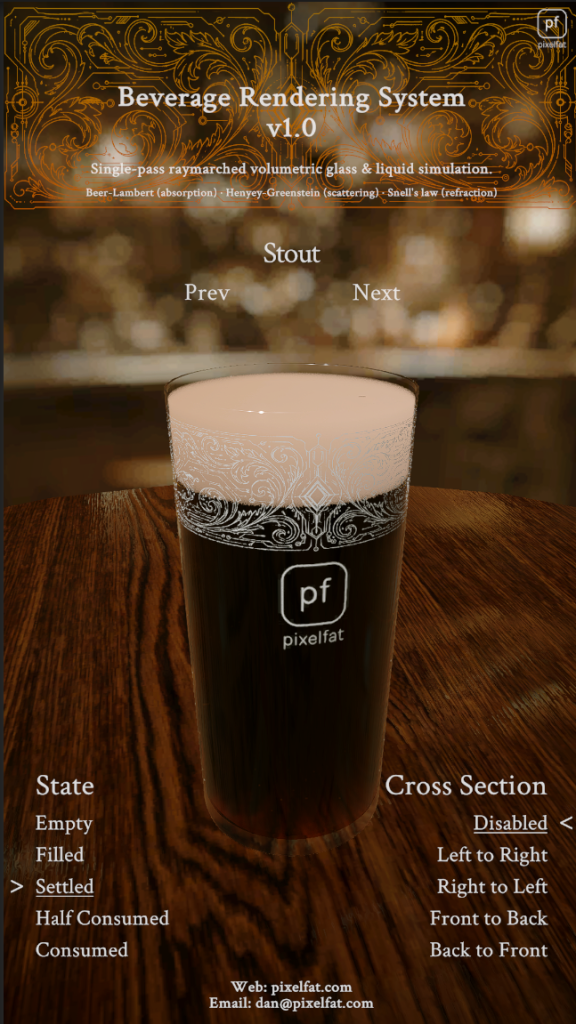
Noope. I want to get this thing in the hands of folks and let them drive it with something other than a mouse, so I’m going to need to use a device gyro. Likewise, my beer renderer needs to handle the lively state, have a convincing foam head that settles, have an open-top vessel like a glass, have a way of defining that glass shape, render the interior and exterior walls of the glass, show bubbles popping, and arrrgh so much more!
So I’m going to need to render billions of bubbles really quickly in a single pass while calculating multiple refractions, surface reflection, absorption, and diffusion.
Time to go grab a beer and have a think….
So I’m going to need to render billions of bubbles really quickly in a single pass.. like a cloud.
There’s some lovely ray-marched cloud rendering techniques that support diffusion, scattering, self shadowing. Flying through them in War Thunder (not a sponsor) is always a delight.
As for the bottle, I can use an animation graph to define the shape and just treat it like a turned solid around it’s local y axis. That way I get the surface, and the normal at any point without having to model anything in 3D.
How it’s done
So, I started the common approaches (clipping, simple refraction, movement-based sloshing) but using a curve to define the shape. Then on to adding ray-marched volumes. To add a foam head and some volume in the fluid we need to see the foam as a volume of its own. With light , some popping bubbles on top and some rising bubbles. Oh, and make sure everything can be tuned serialized and stored / loaded at run-time, as profiles.
Major, Minor and Micro bubbles.
To convincingly render the bubbles was a nightmare, I tried many ways to do it. Mostly based around Worley noise (cellular noise) to attenuate the foam volume march and calculate specular to fake the bubbles. None of it worked well enough so eventually, while thinking about how large bubbles in beer have rings of tiny bubbles around them and are formed using gas rising through the beer, I figured I’d separate them into exactly those three types.
Major – Big shiny bubbles that form at the top of the foam, create a void in it, pop and the void slowly disappears.
Minor – Hundreds of Tiny bubbles that start on the inner surface of the container and rise. A simple particle implementation in a separate pass using instanced geometry was the only viable solution here as we can only write depth once in a pass and we need them to be behind the glass, and in the fluid.
Micro – The bajillions of bubbles that make up the foam head. Mix into the fluid, settle at the top and even become a concave mass as the ale is consumed.
The major and micro bubbles needed to interact with each other. I went down a huge rabbit-hole with Claude until we arrived at me describing a ring of extra density around the big bubbles like Saturn’s rings, but using a fresnel falloff to expose the bubble through the top of the foam.
Eventually I plucked up the courage to let Claude at it and the result wasn’t bad at all. I admit, there’s a lot of times when I look at how Claude implements things on top of my work and think, why the f would you do it that way? But i’m really happy with the result, so it stays along with the several types of jitter I had it try for me to break up the layered pattern that was emerging from each depth step.
Great job, Claude.
The head needed to look genuinely white and soft, not just opaque. Real foam gets its brightness from light bouncing repeatedly between millions of tiny bubble surfaces. To approximate this without tracing thousands of light paths, I compute three scatter terms at progressively halved density, simulating light that has bounced through the foam. A single blend parameter lets me dial between single and multiple scatter to taste.
Beer’s Law
I shit you not, for physically correct opacity accumulation of the foam head and in-liquid volume we calculate it using ‘Beer’s Law’.
1 - exp(-density * stepSize)It’s also used to calculate the light absorption, attenuating the foam color with depth below the surface. It’s what makes the foam head lighter at the top and darker at the bottom, and also shows a clear under-side to the foam.
So, it just had to be done now.
Self-shadowing is handled analytically rather than casting a shadow ray per step (which is pretty expensive), each sample measures how far horizontally the light direction has had to travel through the foam to reach it, and attenuates accordingly. This gives natural darkening at the base of the foam head and under any dense patches, without any additional ray cost. Akin to how clouds are dark on the underside, and blown-out brightness on top and around the edges.
The directionality of the scatter itself is controlled by a Henyey-Greenstein phase function (thanks again, Claude!), the same model used for atmospheric scattering and cloud rendering. At near-zero anisotropy (the right setting for real foam) it produces the characteristic uniform brightness you see in a freshly poured pint, regardless of which direction you’re looking from.
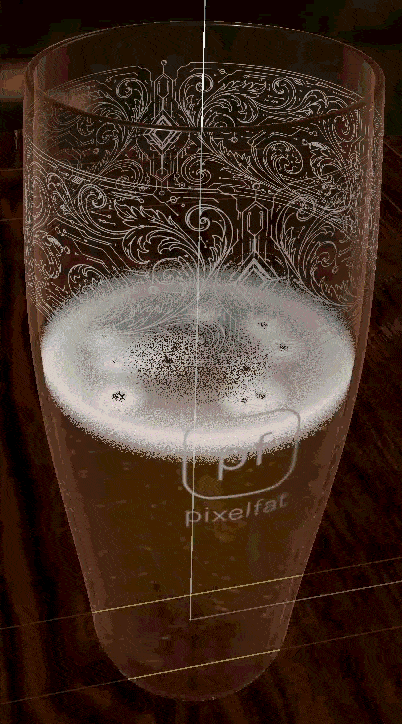
Overview
- Glass walls: Found analytically by traversing a profile curve (side wall crossings, bevel intersections)
- Liquid surface: Found analytically (plane/inner wall intersections)
- Foam volume: Stepped raymarching through the bounding interior, density sampled at each step.
- Fluid Volume (cloudyness): Will treat foam and fluid volumes separately, but compute them in the same march.
- Popping Bubbles: Squished spheres on top of the foam head that pop and leave a void in the foam.
- Rising Bubbles: Analytical ray-ellipsoid intersection per bubble, instanced rendering with a separate bubble shader so I can fake them looking spherical without having to push tons of polys.
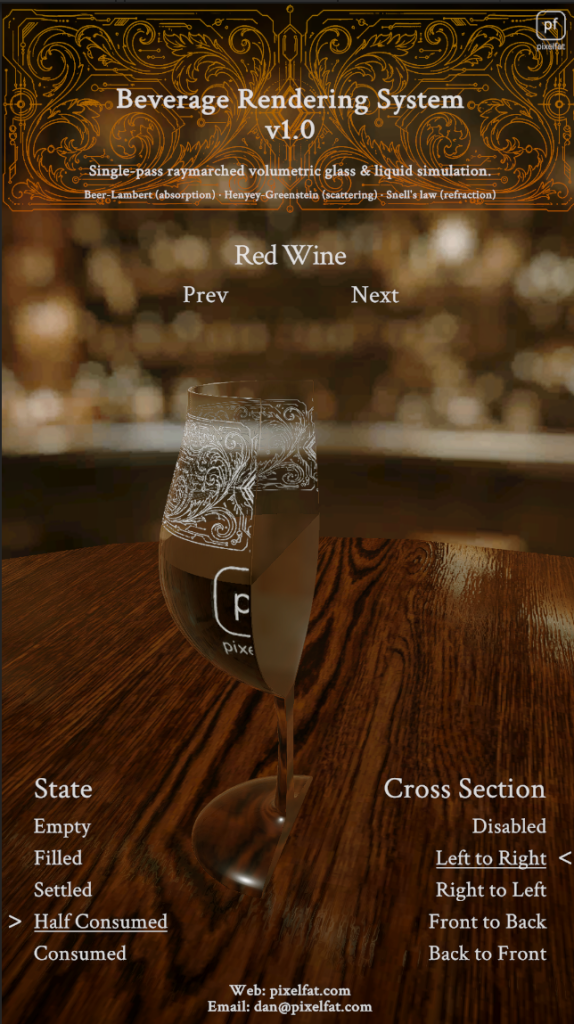
- Decals: Two separate decals texture-sampled as a part of the inner and outer glass walls. Refracted through the liquid they look amazing and really sell the effect.
- Interaction: Mouse, touch or gyro. Implemented an interface to drive this thing then make touch + gyro, mouse + gyro, mouse or touch only, etc and pick one at runtime.
Bonus Content – Rim & Cross-sections
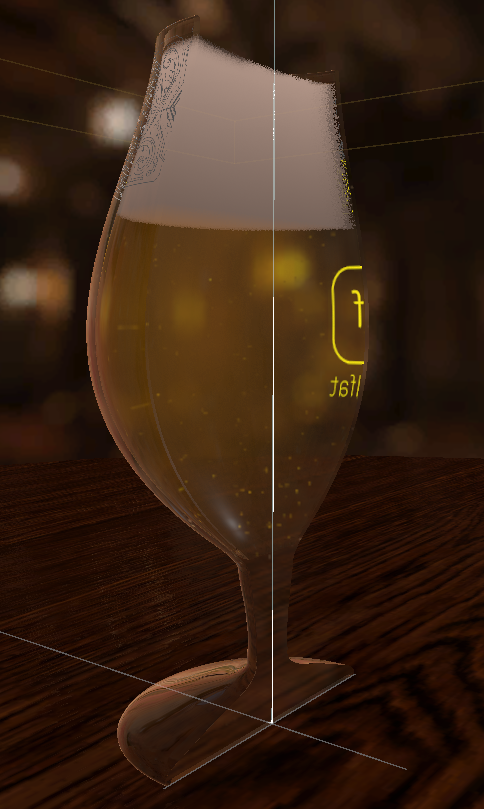
One thing I wasn’t expecting to spend as long on as I did was the glass rim. A drinking glass has a torus-shaped bevel at the top edge, and getting that to correctly refract and reflect what’s inside the glass, the liquid, the foam, the decals.. Well it turned out to be a proper rabbit hole.
The problem is that the entire object is rendered in a single pass, so the rim can’t simply “look through” something that hasn’t been rendered yet. The solution was to redirect the ray-marching ray itself at the bevel surface using Snell’s law, so that everything else like the foam, the liquid and the decals get computed along the physically correct refracted path rather than straight through. The result is that the rim genuinely bends the view of the glass contents, the same way a real glass rim does when you hold it up to the light. Along with the GGX specular which is applied to both the liquid and the glass… I think it looks great. One of those things you don’t notice but took ages to do and tricks the eye into seeing an actual real-life glass.
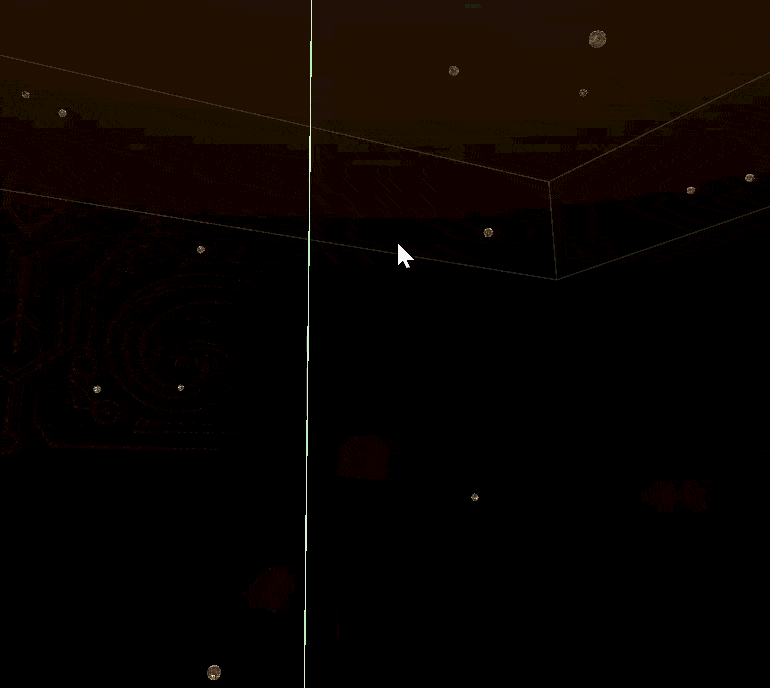
So, now I have this whole thing together I realized that being physically rendered, I could probably just whack a clipping plane in there and see across section. I was very, wrong.. The glass inner and outer walls needed a surface, the bevel needed one, the bubbles needed to be occluded, the volume needed to be clipped.. even the bubbles had to be discarded outside of the clip.. but I got there in the end.
Honorable Mentions
https://80.lv/articles/simulating-liquids-in-a-bottle-with-a-shader Gil Damoiseaux – Technical Artist. This was my main primer for the project. Cheers, Gil!
https://thornbridgebrewery.co.uk/ The brewery near me that inspired the work. Quality booze and brand.